Setup GoDaddy Domain Name To Blogger
GoDaddy is one of the biggest Domain name registrars. GoDaddy holds 1st place for domain selling for many years. GoDaddy is oldest, trusted and highly reliable network. The one of the best this about Godaddy is sometimes they offer the highest discount as compare to another registrar.
Godaddy offers each and every facility within domain advanced panels that means you can easily use domain self-hosted website, self-hosted WordPress blogs, Bloggers blog and more other platforms. One of the best thing which I like in Godaddy is its most secured platform which protects you from outsides attacks. But as personally my all domain names are at Bigrock but there are many reasons which pushed me to buy domains from Bigrock.
Today I am going to discuss using GoDaddy domain names on Blogger blog, in other words, today we will about Domain Mapping, Parking or Customization with blogger. Almost steps of domain settings are same for all domains registers just like I already posted about BigRock Custom domain setup at Blogger Blogs. Now here are steps to setup domain on Blogger blog.
Part 1:- Domain Verification For Blogger
- Open your Blogger account >> Then blog settings
- In Blog, Address box clicks on Add Custom Domain and Type your domain name.
- Then it will show the error for verification just note down details or otherwise leave that tab open and follow below Part 2 in a new browser tab.
Part 2:- Settings For GoDaddy Domain Name For Blogger
- First of all log in your Godaddy account then select your domain open Settings tab
- Then Switch to DNS Zone File just in right side of settings.
- In DNS Zone file tab click on Edit button
Steps For Adding A Records
- Click on the Quick edit button of A record and then add these below four Addresses one by one
- In the Place Host simple @ and in the Place of Point To paste below IPs
216.239.32.21
216.239.34.21
216.239.36.21
216.239.38.21- After Adding above IPS in the same format click on Save Zone File.
Steps for adding cName Records
- In cName Records click on quick edit button.
- Add 1st record where you have to add www in Host and in Point to Add ghs.google.com
- Then Add 2nd Record for blogger verification that we get in Part 1 of this articles and add the same as shown below.
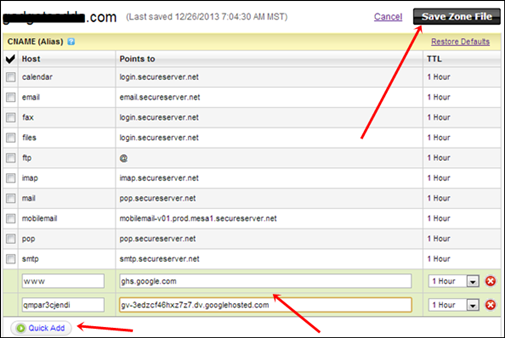
- After Adding above cName records open back your blogger account.
- Open settings and again add your custom domain and click on Save button.
- Suppose if your blogger showing same error message again then close your browser and restart your internet and wait for 2,3 mints and add domain back otherwise try it after 1,2 hours.
- Now Your domain is successfully setup as custom on your blogger blog.
If you have doubt or any question related to this topic don’t forget to ask. I will reply as soon as possible.


Comments
Post a Comment